OpenCart Product Exchange


Within the Opencart store, the customers can now go for a product exchange very easily. Using this extension, the customers can create a product exchange request for replacing the ordered product. The admin can configure various conditions and settings for the product exchange request like – reasons, order status, payment method, shipping method, terms & conditions, etc. The exchange will be managed by a separate order ID.


Features:
Use Case:
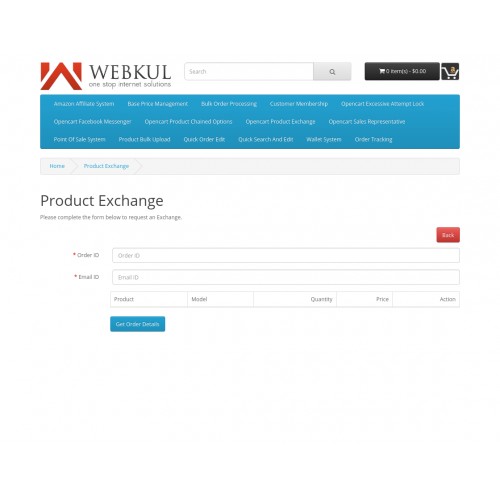
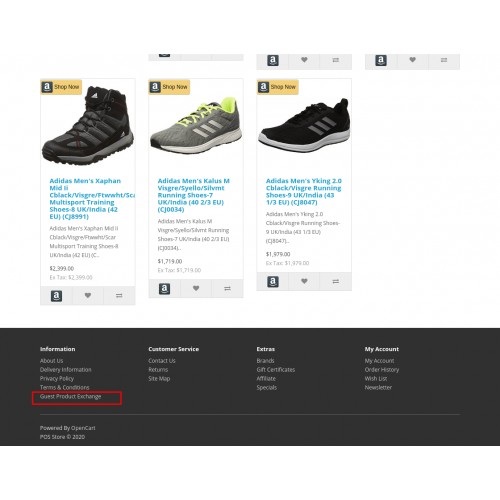
As in the default Opencart, there is no option for the customers to make an exchange request and this is where this extension comes handy. The customers can easily generate an exchange request under their account panel.
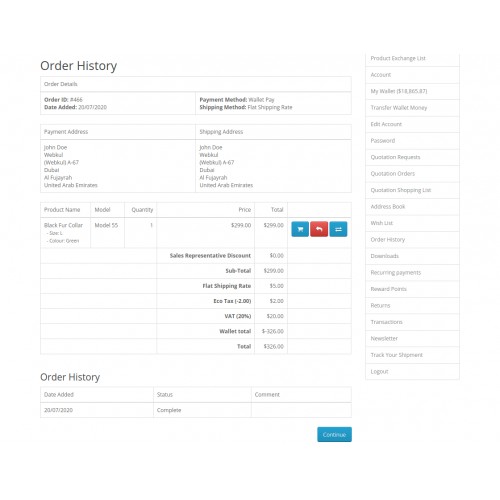
The customers can find a return button for a particular product. This depends upon the selected order status by the admin in the module configuration. When the admin changes the order state to the selected order status, the exchange button appears at the customer end.
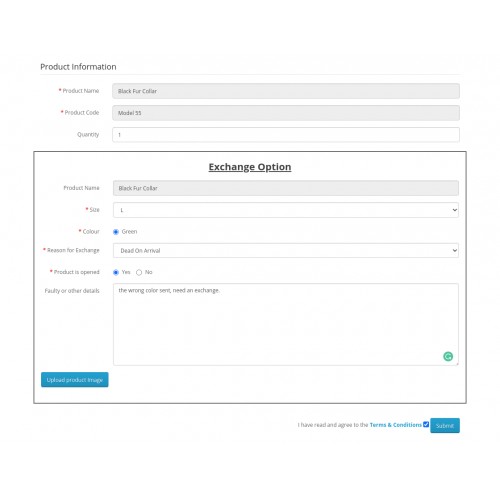
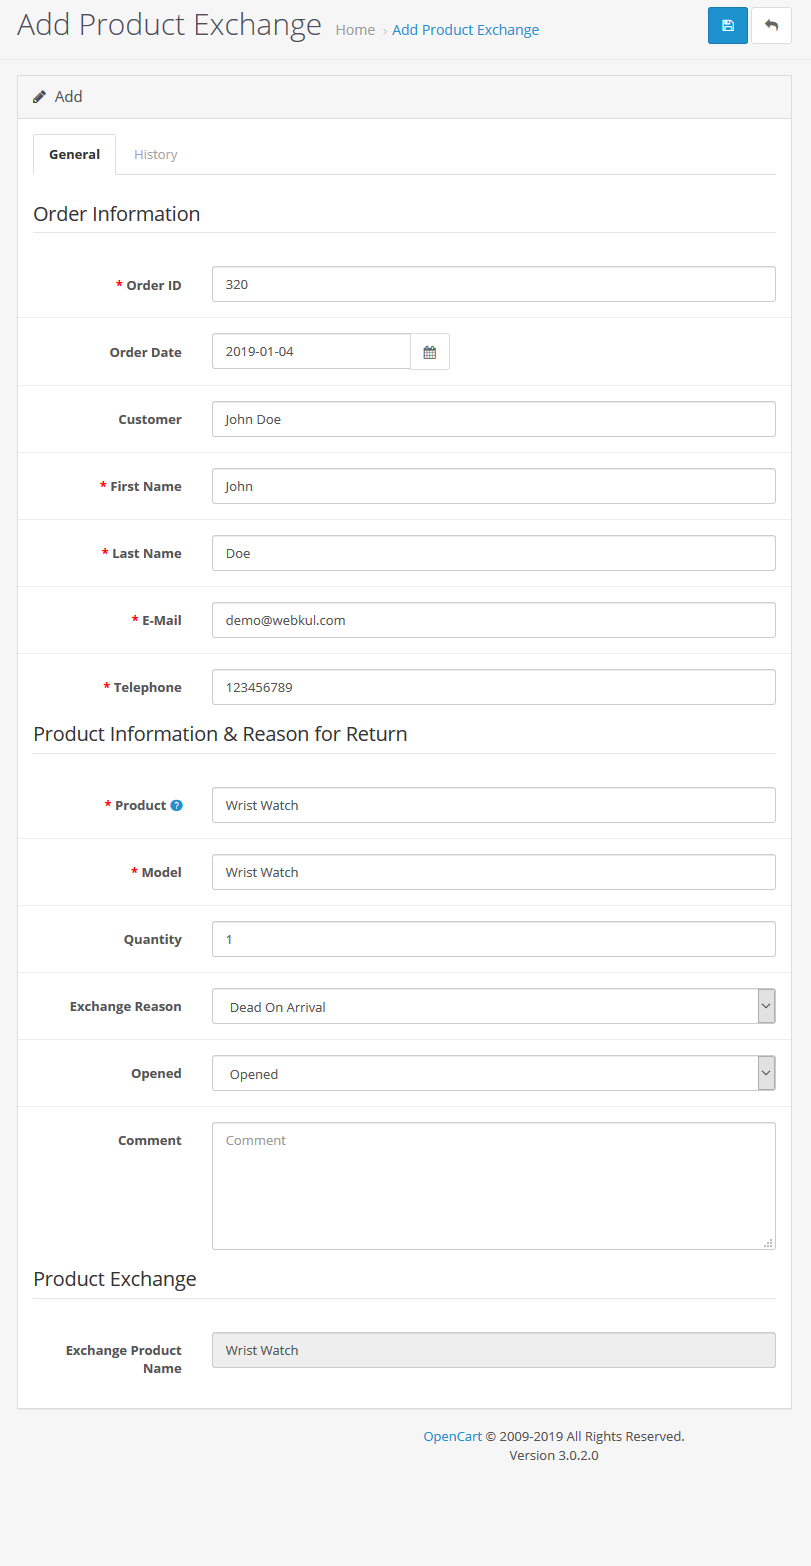
After that, the customer needs to select the Reason for exchange, select if the product is opened, and enter the faulty or details. Now, after clicking the Submit button a product exchange request will be generated.
Lastly, the admin can check this request and accordingly the admin can make the status of this particular request as Completed so as to complete the exchange request.
workflow:
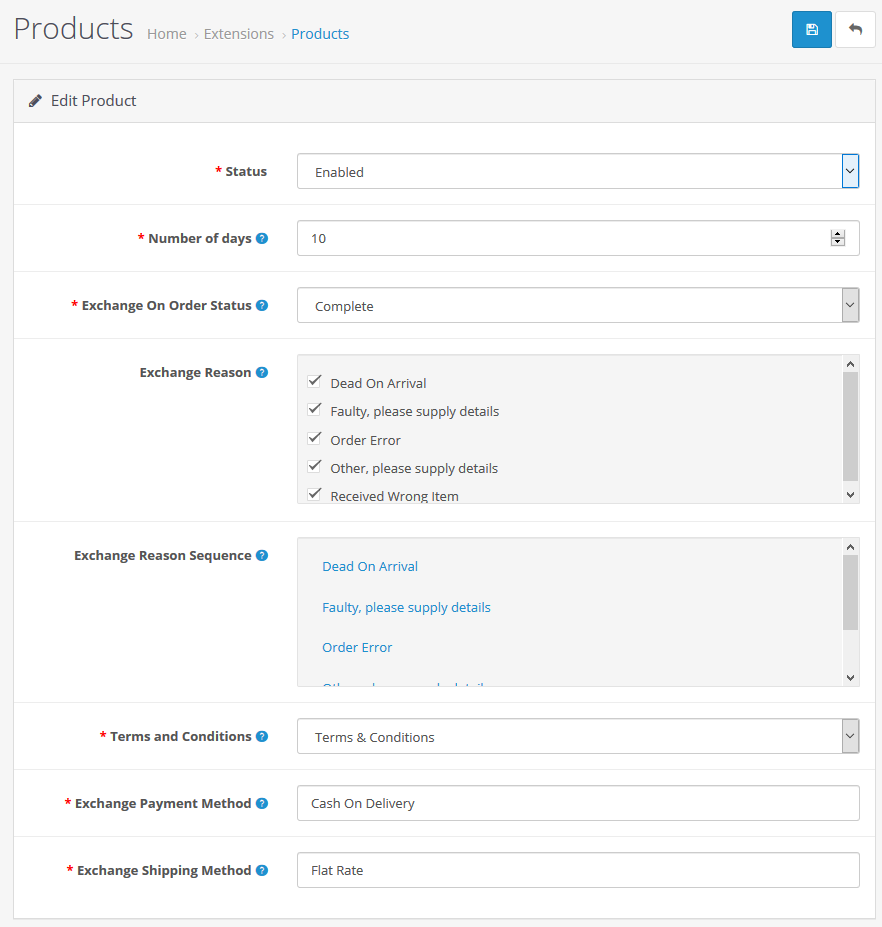
After the successful installation of the extension, the admin will configure the module for use. Here, the admin will be able to - enable the extension, set the number of days after order place up to which the product can be exchanged, select order status for the exchange,
Now, depending up the selected order status by the admin in the module configuration, when the admin changes the order state to the selected order status, the exchange button appears at the customer end.

Tapping the exchange button brings up another section. Here, the customer needs to select the Reason for exchange, select if the product is opened, and enter the faulty or details. Now, after clicking the Submit button a product exchange request will be generated.
In addition, customers can upload an exchange image for reference, even can upload multiple images by clicking the upload product image button depend on the admin configuration.
Now, after clicking the Submit button a product exchange request will generate.

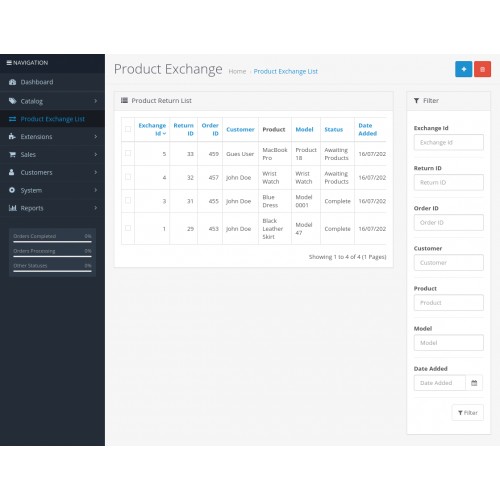
The admin can navigate to the Product Exchange section. Here, the admin can see all the product exchange orders that have been placed by the customers.
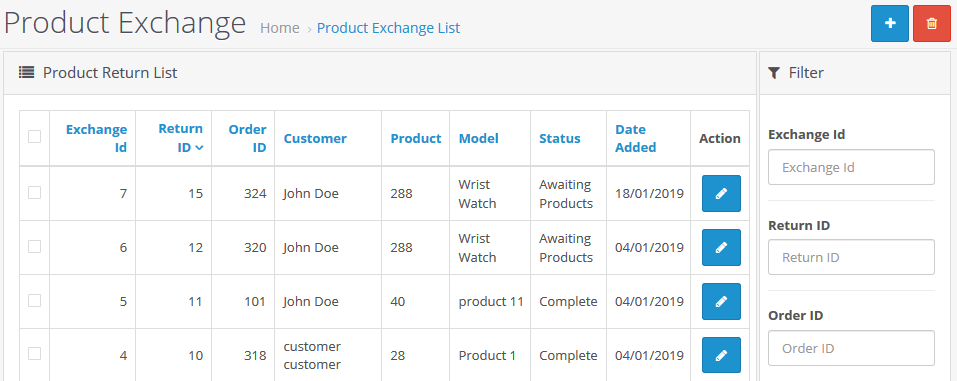
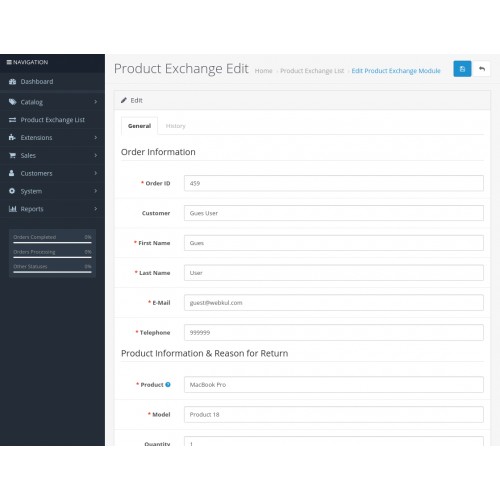
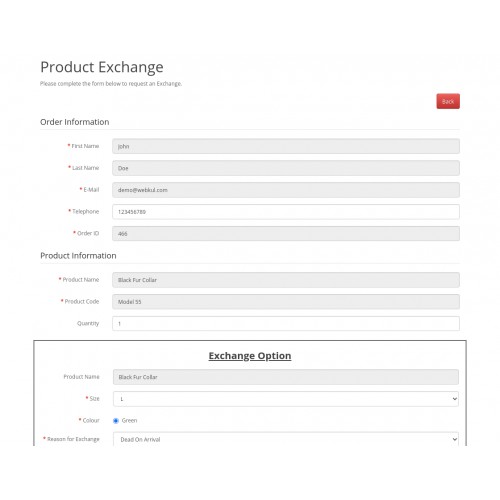
Tapping the edit button under the Action column, this opens up the details for the particular product exchanged. Here, under the General tab, the admin can see the order information for the product exchange that the customer has submitted.

Now, the admin will navigate to the Orders section in the admin backend panel. Here, the admin will complete the second-order that got created here after the exchange request got generated by the customer.
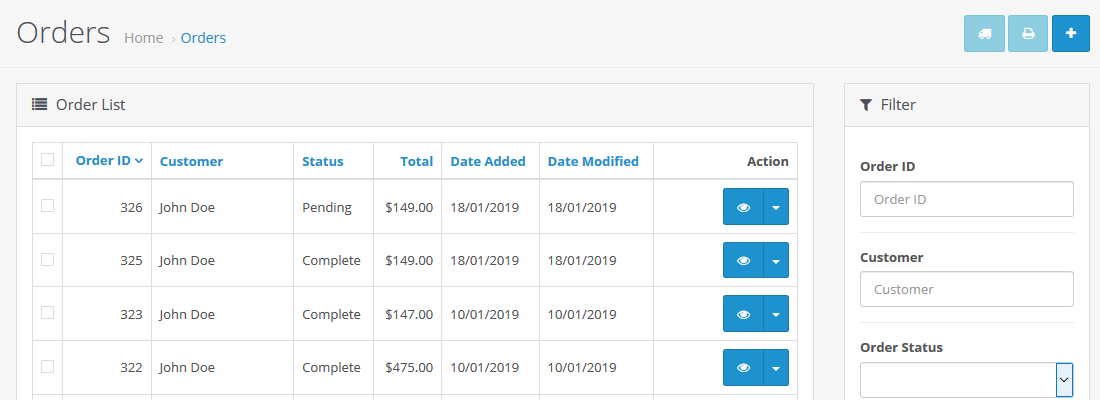
Tap the view button(under action column) to view the order and then to complete this order.

After completing the order, the admin will see a message that says “You have modified module Product Exchange“.

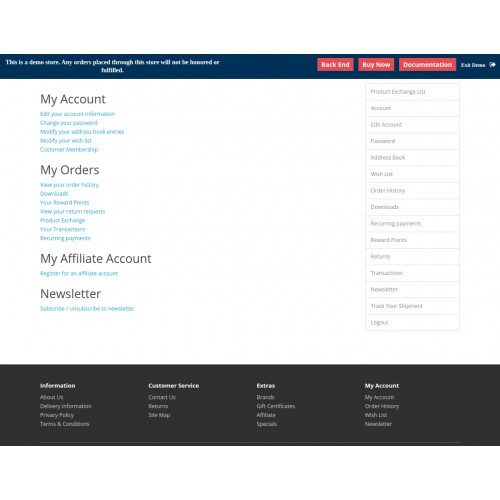
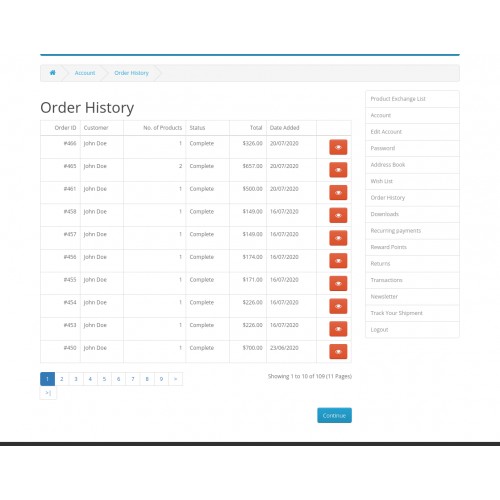
Lastly, the customer can navigate to his account panel and the go-to Product Exchange List as shown below in the snapshot.

Click the View button to check the details of the product exchange.

At the same time, another order(for the exchange product) is created under the backend Sales section of the Opencart website that can be checked by the admin.

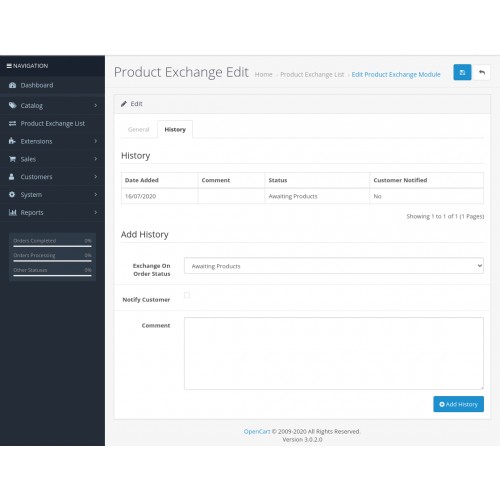
Now, under the Product Exchange List, the admin will navigate to the particular order and tap the edit button under the Action column.
After this, the admin will go to the History tab and will select the exchange on order status. After tapping the Add History button, the request will be generated for exchange.


Some Moments Of Appreciation


Support Policy
Features:
- Enable/disable the module
- Admin can set the number of days
- Admin can select exchange on order status
- Admin can select multiple exchange reasons
- Set exchange reason sequence
- Select and display terms & conditions
- Select exchange shipment and payment method
- Separate order ID is created for the exchanged product
- Admin can also create an exchange request from the backend
- View and filter product exchange list
- Notify customers via email
- Select the exchange product option. eg- size, color.
- Customers can upload an exchange product image from the customer panel.
- The admin can enable/disable upload image option for customers.
- The admin can set the maximum image number to upload for exchange requests.
- Select the exchange product option. eg- size, color.
- The admin can also set an image extension which required to upload.
- The admin can see the uploaded Image at the product exchange order page.
Use Case:
As in the default Opencart, there is no option for the customers to make an exchange request and this is where this extension comes handy. The customers can easily generate an exchange request under their account panel.
The customers can find a return button for a particular product. This depends upon the selected order status by the admin in the module configuration. When the admin changes the order state to the selected order status, the exchange button appears at the customer end.
After that, the customer needs to select the Reason for exchange, select if the product is opened, and enter the faulty or details. Now, after clicking the Submit button a product exchange request will be generated.
Lastly, the admin can check this request and accordingly the admin can make the status of this particular request as Completed so as to complete the exchange request.
workflow:
After the successful installation of the extension, the admin will configure the module for use. Here, the admin will be able to - enable the extension, set the number of days after order place up to which the product can be exchanged, select order status for the exchange,
Now, depending up the selected order status by the admin in the module configuration, when the admin changes the order state to the selected order status, the exchange button appears at the customer end.
Tapping the exchange button brings up another section. Here, the customer needs to select the Reason for exchange, select if the product is opened, and enter the faulty or details. Now, after clicking the Submit button a product exchange request will be generated.
In addition, customers can upload an exchange image for reference, even can upload multiple images by clicking the upload product image button depend on the admin configuration.
Now, after clicking the Submit button a product exchange request will generate.
The admin can navigate to the Product Exchange section. Here, the admin can see all the product exchange orders that have been placed by the customers.
Tapping the edit button under the Action column, this opens up the details for the particular product exchanged. Here, under the General tab, the admin can see the order information for the product exchange that the customer has submitted.
Now, the admin will navigate to the Orders section in the admin backend panel. Here, the admin will complete the second-order that got created here after the exchange request got generated by the customer.
Tap the view button(under action column) to view the order and then to complete this order.
After completing the order, the admin will see a message that says “You have modified module Product Exchange“.
Lastly, the customer can navigate to his account panel and the go-to Product Exchange List as shown below in the snapshot.
Click the View button to check the details of the product exchange.
At the same time, another order(for the exchange product) is created under the backend Sales section of the Opencart website that can be checked by the admin.
Now, under the Product Exchange List, the admin will navigate to the particular order and tap the edit button under the Action column.
After this, the admin will go to the History tab and will select the exchange on order status. After tapping the Add History button, the request will be generated for exchange.
Some Moments Of Appreciation
Support Policy
Price
$79.00
- Developed by OpenCart Partner
- 3 Months Free Support
- Documentation Included
Rating
Compatibility
3.0.0.0, 3.0.1.0, 3.0.1.1, 3.0.1.2, 3.0.1.3, 3.0.2.0, 3.0.3.0, 3.0.3.1, 3.0.3.2, 3.0.3.3, 3.0.3.5, 3.0.3.6, 3.0.3.7, 3.0.3.8, 3.0.3.9, 3.0.4.0, 3.0.4.1
Last Update
30 Jun 2025
Created
30 Jan 2019
4 Sales
0 Comments

Login and write down your comment.
Login my OpenCart Account