
The Benefits of Starting an Online Store for Free
Launching an online store is an exciting opportunity, but the costs of setting up a business can be overwhelming. Fortunately, OpenCart provides a solution that allows entrepreneurs to start selling without upfront investment. Whether you're testing a new business idea or expanding an existing one, a free online store offers flexibility without financial risk. To maximize performance and scalability, pairing your store with a best Magento Hosting Solution can provide a seamless and optimized ecommerce experience.
Low Barrier to Entry
Traditional retail businesses require significant capital for rent, inventory, and marketing. In contrast, a free online store eliminates many of these costs. With OpenCart, you can build a fully functional eCommerce website without purchasing expensive software or paying monthly subscription fees. This makes it an ideal choice for startups, small businesses, and solo entrepreneurs who want to enter the market with minimal expenses.

Full Control Over Your Business
Unlike marketplace platforms such as Amazon or eBay, where sellers must follow strict policies and pay commission fees, OpenCart gives you complete ownership of your store. You control everything from product listings and pricing to customer interactions and marketing strategies. This independence allows you to scale your business on your terms, without restrictions or unexpected costs.
Wide Range of Customization Options
A free online store doesn't mean compromising on features. OpenCart offers a variety of free themes and extensions that enable you to tailor your store’s design and functionality. Whether you want to adjust the layout, add payment options, or optimize for SEO, the platform provides the tools to create a professional-looking store without hiring a developer.
Easy Scalability for Growth
Starting small doesn’t mean staying small. As your business grows, OpenCart allows you to expand effortlessly. You can add unlimited products, integrate multiple ecommerce payment gateways, and optimize your site for higher traffic without migrating to a paid plan. This flexibility ensures that your store can evolve with your business, making it a long-term solution rather than just a temporary starting point.
Zero Risk, High Potential
When launching a new business, uncertainty is inevitable. A free OpenCart store minimizes financial risk while offering the potential for profit. If your store gains traction, you can reinvest earnings into premium extensions, paid advertising, or additional services. If it doesn’t work out, you haven’t lost any money on setup costs. This risk-free approach makes OpenCart an excellent platform for testing products and business models before committing to a larger investment.
Starting an online store for free removes financial barriers and lets you focus on building a business that works. With OpenCart, you get a professional eCommerce platform with no hidden fees, giving you the freedom to experiment, grow, and succeed on your own terms.
Why OpenCart is a Great Choice for New Businesses
Starting an online store comes with many decisions, and choosing the right platform is one of the most important. OpenCart stands out as a powerful eCommerce solution, especially for new businesses looking for a free and scalable option. It provides everything needed to set up, manage, and grow an online store—without hidden costs or technical barriers.
Completely Free to Use
Unlike many other eCommerce platforms that require monthly fees or transaction charges, OpenCart is open-source and completely free to install. This allows business owners to allocate their budget toward marketing, inventory, or other essentials rather than software costs.

Easy to Set Up and Manage
New entrepreneurs often struggle with complex website builders or costly development services. OpenCart simplifies the process with a straightforward installation and an intuitive admin panel. Even without technical expertise, users can add products, configure payments, and manage orders with ease.
Customizable Without Additional Costs
A store’s design plays a crucial role in attracting customers. OpenCart offers a wide range of free themes and extensions, allowing businesses to personalize their online shop without hiring a developer. Features such as SEO tools, multi-language support, and mobile-friendly templates help create a professional store that meets customer expectations.
Built-in Features to Support Business Growth
New businesses need an eCommerce platform that grows with them. OpenCart supports an unlimited number of products and categories, multiple payment gateways, and various shipping options. Whether selling locally or internationally, the platform provides the flexibility to expand without switching to a paid plan.
No Commission Fees or Sales Restrictions
Unlike marketplace platforms such as Amazon or Etsy, OpenCart doesn’t take a percentage of sales. Business owners keep 100% of their revenue, making it an ideal choice for startups looking to maximize profits. Additionally, there are no restrictions on the types of products that can be sold, as long as they comply with legal regulations.
For new businesses, OpenCart offers a cost-effective, user-friendly, and highly customizable eCommerce solution. With no monthly fees, built-in growth features, and full control over your store, it’s an excellent choice for entrepreneurs ready to start selling online.
Understanding What OpenCart Offers
Before setting up an online store, it's important to know what OpenCart provides. As a free and open-source eCommerce platform, OpenCart gives businesses a complete set of tools to build, manage, and grow an online store. Whether you’re a solo entrepreneur or a small business owner, OpenCart offers features that make selling online easier and more efficient.
A Fully Functional eCommerce Platform
OpenCart is more than just a website builder—it’s a full-featured eCommerce solution. It includes product management, secure transactions, and order processing, all within a single platform. Users can add unlimited products, set up multiple payment gateways, and track customer orders without needing third-party software.

No Hidden Fees or Subscription Costs
Many eCommerce platforms charge monthly fees, transaction commissions, or require premium plans to unlock essential features. OpenCart, however, is completely free to download and use. Businesses keep their profits without worrying about hidden costs, making it a budget-friendly choice for startups.
An Easy-to-Use Admin Dashboard
Managing an online store requires a clear and efficient interface. OpenCart’s admin dashboard simplifies store management with an organized layout that allows users to add products, process orders, and view sales reports at a glance. Even without technical knowledge, store owners can navigate the system with ease.
Built-in SEO and Marketing Tools
Visibility is key to attracting customers, and OpenCart includes SEO-friendly features to help stores rank higher on search engines. Users can customize URLs, optimize product pages, and generate meta descriptions without needing additional plugins. OpenCart also supports promotions, discount codes, and affiliate programs to increase sales.
Customizable With Free Extensions and Themes
Every business has unique needs, and OpenCart’s marketplace offers thousands of free and paid extensions. Store owners can add new features, integrate shipping carriers, and choose from a variety of themes to personalize their store’s appearance. This flexibility ensures that businesses can tailor their store without expensive development costs.
Scalability for Future Growth
A business may start small, but it needs the ability to expand. OpenCart is designed to handle growth, whether it's increasing product listings, adding multi-store functionality, or integrating third-party services. The platform supports multiple currencies and languages, making it ideal for businesses with international customers.
OpenCart provides everything needed to start and scale an online business without financial barriers. Its powerful features, customization options, and cost-free model make it a great choice for entrepreneurs looking to launch their store with confidence.
Choosing a Hosting Option: Free vs. Paid Hosting Explained
Selecting the right hosting option is a crucial step when setting up an OpenCart store. While OpenCart itself is free, your website needs a hosting service to be accessible online. There are two primary choices: free hosting and paid hosting. Each has its advantages and limitations, so understanding the differences can help you make the best decision for your business.

Free Hosting: What You Get and What to Consider
Free hosting providers allow users to launch websites without upfront costs. This is appealing to new businesses testing the waters before investing in a full eCommerce setup. However, free hosting comes with trade-offs:
- Limited Performance – Free hosting services often impose restrictions on bandwidth, storage, and website speed. This can lead to slow loading times, especially if your store grows.
- Subdomain Requirement – Many free hosts require users to operate under a subdomain (e.g., yourstore.freehost.com), which may not look professional or be memorable for customers.
- Advertisements and Branding – Some free hosting platforms display ads on your site, over which you have little control. This can affect user experience and credibility.
- Security and Support Limitations – Free plans may not include SSL certificates, data backups, or customer support, leaving your site vulnerable to security threats and downtime.
Who Should Choose Free Hosting?
- Entrepreneurs who want to experiment with OpenCart before committing to a paid plan.
- Businesses that expect low traffic and limited sales in the early stages.
- Individuals launching a temporary or test store before scaling.
Paid Hosting: Why It’s Worth Considering
Paid hosting services offer more reliability, security, and customization options. While they involve costs, they provide essential benefits for serious businesses.
- Custom Domain Name – With paid hosting, you can use a professional domain (e.g., yourstore.com), improving brand credibility and SEO rankings.
- Faster Loading Speeds – Paid hosting plans allocate more server resources, ensuring a smooth shopping experience for customers.
- Stronger Security Measures – Many providers include SSL certificates, automated backups, and malware protection to safeguard your store.
- Scalability and Flexibility – As your business grows, paid hosting allows you to upgrade your resources, add custom features, and integrate third-party applications.
- Reliable Customer Support – Most paid hosting services offer 24/7 support, reducing downtime and technical frustrations.
Who Should Choose Paid Hosting?
- Business owners who want full control over branding and a custom domain.
- Online stores expecting moderate to high traffic and frequent transactions.
- Entrepreneurs looking for better security, faster performance, and technical support.
Recommended Hosting Options for OpenCart
If you choose free hosting, platforms like InfinityFree or 000WebHost may be suitable for testing. However, for a professional store, consider affordable paid hosting services such as:
- Namecheap – A cost-effective solution with free SSL and strong uptime.
- Ultahost – A great option for businesses needing scalable performance.
- Hostinger – Offers OpenCart-optimized hosting with excellent customer support.
- Scalahosting – The #1 Cloud & Website hosting with excellent customer support.
The choice between free and paid hosting depends on your business goals. While free hosting might work for short-term testing, long-term growth demands a solid hosting partner. To discover more reliable Web Hosting Providers, explore Spotsaas a platform where you can compare top-rated hosting solutions, read real user reviews, and find the right fit for your OpenCart store.
How to Install OpenCart on Your Website (Step-by-Step)
Setting up OpenCart on your website is a straightforward process. Whether you’re using a free or paid hosting service, the installation follows a similar structure. Below is a step-by-step guide to help you install OpenCart and prepare your online store for operation.
Step 1: Download the Latest Version of OpenCart
Before installation, you need the latest version of OpenCart.
- Visit the official OpenCart website and navigate to the Downloads section.
- Download the most recent stable release in ZIP format.
- Save the file to your computer for later use.
Step 2: Upload OpenCart to Your Server
If your hosting provider offers a one-click installer, such as Softaculous or Installatron, you can skip this step and proceed with an automated setup. Otherwise, follow these steps to upload OpenCart manually:
- Access Your Hosting Control Panel – Log in to your cPanel or another hosting control panel.
- Open the File Manager – Navigate to the "File Manager" and locate the public_html directory (this is where your website files are stored).
- Upload the OpenCart ZIP File – Click the "Upload" option and select the ZIP file you downloaded earlier.
- Extract the Files – After uploading, right-click the ZIP file and choose Extract to unpack the files into the public_html folder.
Step 3: Create a Database for OpenCart
OpenCart requires a database to store product details, customer accounts, and store settings.
- Go to MySQL Databases – Inside your hosting control panel, find the MySQL Databases option.
- Create a New Database – Enter a name for your database and click Create Database.
- Create a Database User – Add a new user with a secure password, then assign this user to the database with All Privileges enabled.
- Save Your Database Details – You’ll need the database name, username, and password during installation.
Step 4: Run the OpenCart Installation Wizard
Once the files are uploaded and the database is ready, you can start the installation process.
- Open your web browser and enter your domain name (e.g.,
yourstore.com). - The OpenCart installation wizard will appear. Click Continue to start the setup.
- License Agreement – Read and accept the OpenCart license terms.
- Pre-Installation Check – The system will check your server requirements. If all items are marked as green, you can proceed. If any requirements are missing, you may need to update your PHP version or enable missing extensions.
- Database Configuration – Enter the database details you saved earlier, then click Continue.
- Create Admin Account – Set up your administrator username, password, and email address. This will be used to log in to your store’s backend.
- Complete Installation – Once all steps are filled in, click Finish Installation.
Step 5: Secure Your OpenCart Store
To enhance security after installation:
- Delete the Installation Folder – Open the File Manager and remove the
/install/directory. - Set Up SSL Encryption – If your hosting plan includes a free SSL certificate, enable HTTPS in the store settings for secure transactions.
- Change Admin URL – Rename the default
/admin/directory to something unique to prevent unauthorized login attempts.
Installing OpenCart is a simple process that takes only a few minutes. By following these steps, you can set up a professional eCommerce store without technical difficulties. After installation, you can start adding products, customizing your store, and preparing for sales.
Essential Configuration: Store Name, Currency, and Language
After installing OpenCart, the next step is configuring key settings to match your business needs. Setting up your store name, currency, and language ensures a professional and user-friendly experience for your customers. These settings define how your store appears to visitors and how transactions are processed.
Step 1: Setting Your Store Name and Contact Details
Your store name is displayed on the homepage, invoices, and emails. A clear, recognizable name builds credibility and trust.
- Log in to Your OpenCart Admin Panel.
- Navigate to System > Settings and select Edit under your store name.
- Under the General tab, enter:
- Store Name – Choose a name that reflects your brand.
- Store Owner – Add your business or personal name.
- Email – Ensure this is correct, as it will be used for customer inquiries.
- Telephone – Optional but useful for customer support.
- Click Save to update your settings.
Step 2: Configuring Your Store Currency
OpenCart allows transactions in multiple currencies. Selecting the right one ensures accurate pricing and avoids confusion for customers.
- Go to System > Localisation > Currencies.
- Check if your preferred currency is listed. If not, click Add New and enter:
- Currency Title (e.g., US Dollar, Euro, British Pound)
- Code (ISO currency code, e.g., USD, EUR, GBP)
- Symbol Left/Right (e.g., $ for USD or € for Euro)
- Value (set to 1.0000 for the default currency)
- Enable the currency by setting Status to Enabled.
- To change the default currency, go to System > Settings > Local and select the currency from the dropdown menu.
- Click Save to apply changes.
Step 3: Selecting the Right Language
OpenCart supports multiple languages, allowing stores to cater to international customers. Setting up the correct language improves user experience and accessibility.
- Navigate to System > Localisation > Languages.
- Check if your preferred language is listed. If not, click Add New and enter:
- Language Name (e.g., Spanish, French, German)
- Code (ISO language code, e.g., es for Spanish, fr for French)
- Locale (country-specific format, e.g., en_US for US English)
- Status – Set to Enabled.
- To set a default language, go to System > Settings > Local and choose from the dropdown.
- Click Save to finalize the settings.
Configuring your store name, currency, and language is essential for a professional and seamless shopping experience. These settings ensure that customers can understand prices, navigate your store easily, and trust your business. Once these steps are complete, you’re ready to start adding products and preparing for sales.
How to Create Product Listings with Images and Descriptions
Adding products to your OpenCart store is a critical step in launching your online business. A well-structured product listing with high-quality images and clear descriptions helps attract customers and drive sales. This guide walks you through the process of creating product listings that are both informative and visually appealing.
Step 1: Access the Product Management Section
- Log in to Your OpenCart Admin Panel.
- Navigate to Catalog > Products in the left menu.
- Click the Add New button to create a new product listing.
Step 2: Enter Basic Product Details
Providing accurate product details improves customer trust and helps with search engine optimization (SEO). In the General tab, fill in the following fields:
- Product Name – Use a clear and concise name that describes the product.
- Description – Write a detailed but easy-to-read product description. Include key features, benefits, and any unique selling points.
- Meta Title – This appears in search engine results, so it should be relevant and compelling.
- Meta Description – Provide a short summary of the product to improve visibility in search rankings.
Step 3: Add High-Quality Product Images
Images play a crucial role in online shopping. Customers rely on visuals to evaluate products, so ensure your photos are clear and high-resolution.
- Go to the Image tab and click Add Image.
- Upload a primary product image that best represents the item.
- Add additional images to show different angles, colors, or features.
- Keep image file names relevant (e.g., blue-running-shoes.jpg instead of image123.jpg).
Step 4: Set Pricing and Inventory
- Switch to the Data tab to enter pricing and stock details.
- Fill in the following fields:
- Price – Set the base price of the product.
- Quantity – Enter the number of units available.
- Minimum Quantity – Specify the lowest amount a customer can order.
- Stock Status – Select the message displayed when a product is out of stock (e.g., “Out of Stock” or “Pre-Order”).
Step 5: Organize Products into Categories
Grouping products into categories helps customers find what they need faster.
- Go to the Links tab.
- Under Categories, start typing the name of an existing category or create a new one.
- You can assign a product to multiple categories if applicable.
- Add Manufacturer/Brand details if needed.
Step 6: Configure Shipping and Tax Options
- In the Data tab, set the Weight and Dimensions if shipping charges are calculated based on size.
- Under Tax Class, choose the appropriate tax setting for your product.
Step 7: Enable and Save the Product Listing
- Go to the Status dropdown and select Enabled to make the product live.
- Click Save to finalize the listing.
An effective product listing improves customer experience and increases conversions. By using detailed descriptions, high-quality images, and organized categories, you can create a store that attracts buyers and encourages sales. After listing your products, review them periodically to ensure they remain accurate and up to date.
Setting Up Pricing, Inventory, and Shipping Options
Once your products are listed in OpenCart, configuring pricing, inventory, and shipping options ensures smooth transactions and accurate order fulfillment. These settings help customers understand product availability, shipping costs, and payment expectations. Proper configuration also prevents stock issues and enhances the buying experience.
Step 1: Configuring Product Pricing
Pricing is a crucial factor in customer purchasing decisions. OpenCart allows you to set product prices, apply discounts, and manage taxes.
- Go to
Catalog > Productsin your admin panel. - Click on the product you want to edit or create a new product.
- Navigate to the Data tab and locate the Price field.
- Enter the base price in your store’s default currency.
- If applicable, add a Special Price under the Special tab to create a limited-time discount.
- Click Save to update your product pricing.
Step 2: Managing Inventory and Stock Levels
Accurate inventory tracking prevents overselling and stock shortages. OpenCart provides stock management features to help you maintain inventory.
- Go to the Data tab while editing a product.
- Set the Quantity to reflect available stock.
- Define a Minimum Quantity to ensure bulk orders meet a required threshold.
- Under Stock Status, choose a message for out-of-stock products, such as Out of Stock or Pre-Order.
- Enable Subtract Stock to automatically reduce inventory after a purchase.
- Click Save to apply your inventory settings.
Step 3: Setting Up Shipping Options
Shipping configuration determines how products reach customers. OpenCart supports multiple shipping methods, including free shipping, flat rates, and real-time carrier calculations.
- Navigate to
Extensions > Extensions > Shipping. - Select a shipping method that fits your business model, such as:
- Flat Rate Shipping – A fixed cost per order.
- Free Shipping – Available when customers meet a minimum purchase requirement.
- Weight-Based Shipping – Costs calculated based on product weight.
- Click Edit next to the selected shipping method.
- Enter the required details, such as shipping cost, applicable zones, and minimum order amounts.
- Enable the method and click Save to apply the changes.
Step 4: Enabling Tax Classes (If Required)
If your store needs to charge sales tax or VAT, you can set up tax rules in OpenCart.
- Go to
System > Localisation > Taxes > Tax Classes. - Click Add New and enter a tax class name.
- Define the Tax Rate, specifying the geographical location and percentage.
- Apply the tax class to relevant products by selecting it in the Data tab under Tax Class.
- Click Save to finalize tax settings.
Proper pricing, inventory management, and shipping settings are essential for running a successful online store. By configuring these options correctly, you ensure transparency for customers and smooth business operations. Regularly reviewing and updating these settings helps maintain accurate stock levels and competitive pricing.
Free OpenCart Themes: Where to Find Them and How to Install
A well-designed store builds trust and improves the shopping experience. OpenCart allows you to customize your store’s appearance with themes, many of which are available for free. Choosing the right theme ensures your site looks professional while remaining easy to navigate. This guide will show you where to find free OpenCart themes and how to install them.
Where to Find Free OpenCart Themes
Several platforms offer free themes compatible with OpenCart. Here are some reliable sources:
OpenCart Marketplace
- Visit the official OpenCart Marketplace.
- Filter by Free to find no-cost themes.
- Read user reviews and check theme compatibility with your OpenCart version.
Third-Party Websites
- Sites like TemplateMonster, ThemeForest (Free Section), and Colorlib occasionally offer free OpenCart themes.
- Always download from trusted sources to avoid security risks.
GitHub and Developer Websites
- Some independent developers share free OpenCart themes on GitHub.
- Ensure the theme is actively maintained and works with your OpenCart version.
How to Install an OpenCart Theme
Once you’ve found a theme that fits your store, follow these steps to install it.
Step 1: Download the Theme
- Ensure the theme is compatible with your OpenCart version.
- Download the theme file (usually in
.zipformat).
Step 2: Upload the Theme to Your Store
- Log in to your OpenCart admin panel.
- Navigate to Extensions > Installer.
- Click Upload and select the
.zipfile of your theme. - Wait for the installation to complete. You should see a success message.
Step 3: Activate the Theme
- Go to Extensions > Extensions and select Themes from the dropdown menu.
- Find your newly installed theme and click Edit.
- Set the Status to Enabled.
- Click Save to apply the changes.
Step 4: Customize the Theme
- Navigate to Design > Themes to access customization settings.
- Modify the layout, colors, and fonts as needed.
- Preview the changes before making them live.
Using a free OpenCart theme helps you launch your store without additional costs while maintaining a professional design. By selecting a theme that aligns with your brand and configuring it properly, you create a visually appealing and user-friendly online store.
Customizing the Look and Feel of Your Store Without Coding
A visually appealing store creates a positive shopping experience and strengthens your brand. OpenCart allows you to customize your store’s appearance without writing code. By using built-in settings, themes, and layout options, you can personalize your online store to match your brand’s identity.
 https://www.opencart.com/index.php?route=marketplace/extension/info&extension_id=45380
Step 1: Adjusting Store Settings
Basic customization begins with updating your store’s general settings.
- Log in to your OpenCart admin panel.
- Navigate to System > Settings and click Edit under your store name.
- In the General tab, update:
- Store Name and Logo – Upload a high-quality logo that represents your brand.
- Meta Title and Description – These help with SEO and branding.
- Contact Information – Ensure customers can reach you easily.
- Click Save to apply changes.
Step 2: Selecting and Customizing a Theme
OpenCart’s theme system allows you to modify your store’s appearance without coding.
- Go to Extensions > Extensions and select Themes from the dropdown.
- Find the active theme and click Edit.
- Customize the available options, such as:
- Background colors and font styles.
- Product image sizes for different sections.
- Header and footer layouts.
- Click Save to update your store’s design.
Step 3: Customizing the Homepage Layout
The homepage is the first impression visitors get of your store. OpenCart allows you to modify layouts through the admin panel.
- Navigate to Design > Layouts.
- Select Home to edit the homepage layout.
- Add or rearrange sections such as:
- Banners to highlight promotions.
- Featured Products to showcase bestsellers.
- Categories for easier navigation.
- Click Save to apply changes.
Step 4: Adding Banners and Custom Content
Banners help attract attention to sales, new arrivals, or special deals.
- Go to Design > Banners and click Add New.
- Upload a banner image and enter a link to the relevant product or category.
- Assign the banner to a specific page or section, such as the homepage.
- Click Save, then go to Design > Layouts to place the banner where needed.
Step 5: Using Widgets and Modules for Additional Customization
OpenCart’s modules add extra functionality to your store.
- Go to Extensions > Extensions and select Modules.
- Install and configure modules such as:
- Slideshow to display rotating images.
- Latest Products to highlight new arrivals.
- Testimonials to build credibility.
- Assign modules to specific pages using Design > Layouts.
Customizing your OpenCart store doesn’t require coding skills. By adjusting themes, layouts, and modules, you can create a unique online store that reflects your brand. Regularly updating your design ensures a fresh, engaging experience for customers.
Using Free Payment Methods Like PayPal and Bank Transfers
Offering convenient and secure payment methods is essential for any online store. OpenCart provides built-in options to accept payments without additional costs. PayPal and bank transfers are two popular methods that allow you to start accepting payments immediately. This guide will show you how to set up both options efficiently.
Step 1: Enabling PayPal in OpenCart
PayPal is a widely accepted payment method that allows customers to pay with their PayPal balance, credit cards, or linked bank accounts.
- Log in to your OpenCart admin panel.
- Navigate to Extensions > Extensions and select Payments from the dropdown.
- Locate PayPal (standard or express) and click Install if it’s not already installed.
- Click Edit to configure the settings:
- Enter your PayPal email address (this must be linked to your PayPal account).
- Set transaction mode to Live (for real transactions) or Sandbox (for testing).
- Select currency to match your store’s default currency.
- Enable order status updates to track successful payments.
- Click Save to activate PayPal for your store.
Step 2: Setting Up Bank Transfer Payments
Bank transfers provide an alternative for customers who prefer direct payments instead of online gateways.
- Go to Extensions > Extensions and select Payments from the dropdown.
- Find Bank Transfer and click Install if needed.
- Click Edit to customize your settings:
- Enter bank details, including:
- Account Name
- Account Number
- Bank Name
- Branch Code (if applicable)
- IBAN/SWIFT Code (for international transfers)
- Enable the payment method to make it available at checkout.
- Set order status to "Pending" to manually verify payments before processing orders.
- Enter bank details, including:
- Click Save to apply changes.
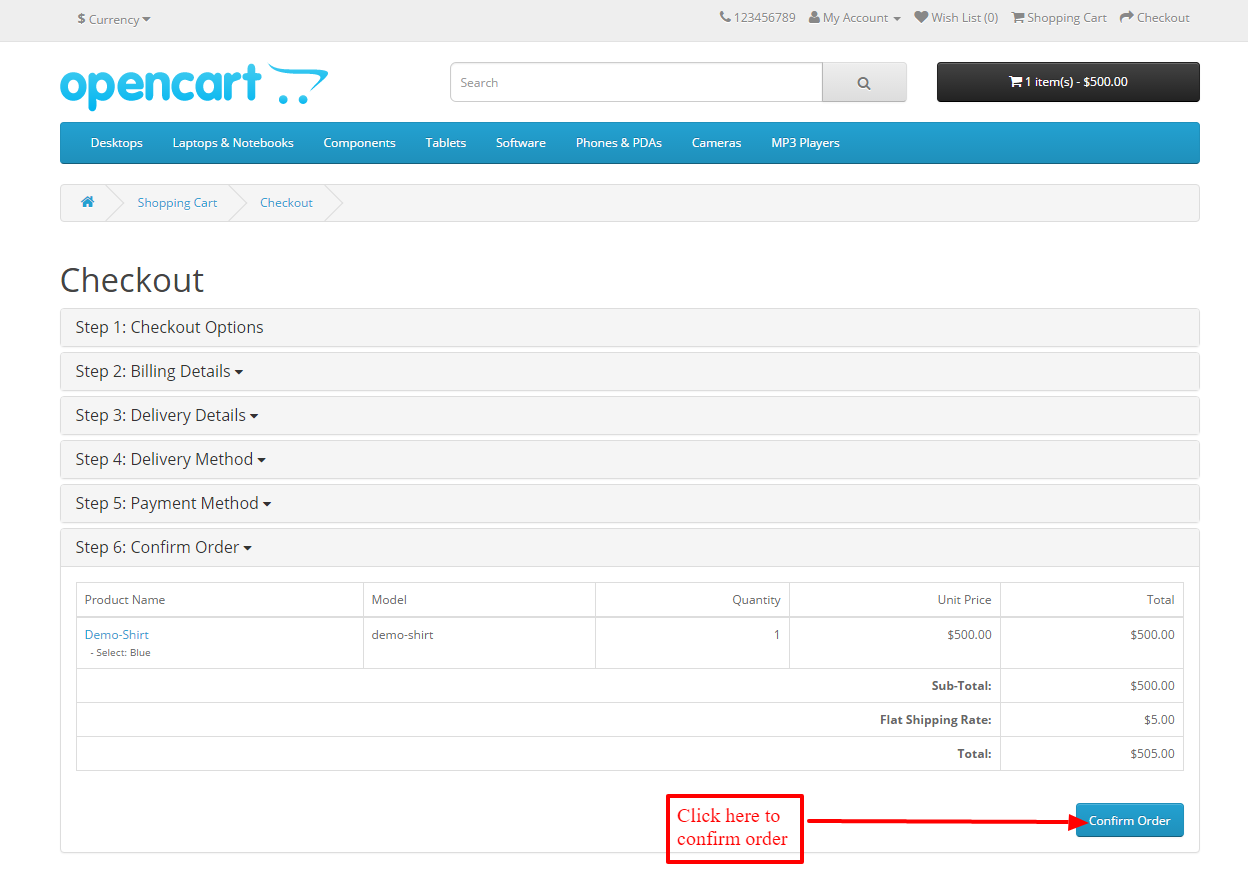
Step 3: Testing and Confirming Payments
Before making your store live, test the payment options to ensure they function correctly.
- For PayPal – Place a test order using Sandbox mode before switching to live transactions.
- For Bank Transfers – Verify that payment details appear correctly at checkout and ensure customers receive instructions for transferring funds.
Using free payment methods like PayPal and bank transfers allows you to accept payments without extra fees or complex integrations. By enabling these options in OpenCart, you provide customers with flexible and secure ways to complete their purchases. Regularly reviewing your payment settings ensures a smooth transaction process for both you and your customers.
How to Enable Guest Checkout for a Smoother Shopping Experience
Allowing customers to complete purchases without creating an account can reduce friction at checkout and increase conversion rates. Many shoppers abandon their carts when forced to register before buying. OpenCart’s guest checkout feature simplifies the process, making transactions faster and more convenient.
Step 1: Enable Guest Checkout in OpenCart
- Log in to your OpenCart admin panel.
- Navigate to System > Settings and click Edit under your store name.
- Go to the Option tab.
- Scroll down to Checkout settings and locate Guest Checkout.
- Set the status to Enabled.
- Click Save to apply the changes.
Step 2: Adjust Payment and Shipping Requirements
Guest checkout works best when combined with flexible payment and shipping options.
- Ensure at least one payment method (such as PayPal or bank transfer) does not require customer registration.
- Enable shipping zones that do not require a logged-in user to process an order.
- Test different payment and shipping configurations to confirm they work with guest checkout.
Step 3: Optimize the Guest Checkout Experience
To prevent cart abandonment, make the checkout process simple and clear:
- Minimize form fields – Ask for only necessary information, such as name, email, and shipping address.
- Offer auto-fill options – Reduce typing time by enabling address suggestions.
- Provide clear instructions – Let customers know they can check out without an account.
- Enable order confirmation emails – Send receipts and tracking details without requiring an account.
Step 4: Test Guest Checkout Before Launching
Before making guest checkout live, place a test order to ensure everything runs smoothly.
- Open your store in a private browsing window.
- Add a product to the cart and proceed to checkout.
- Complete the purchase using guest checkout.
- Verify that the order is processed correctly and that a confirmation email is received.
Enabling guest checkout removes barriers and enhances the shopping experience. Customers can complete purchases quickly, increasing sales and reducing abandoned carts. By keeping the process simple and efficient, your OpenCart store can attract more buyers and improve overall satisfaction.
How to Promote Your OpenCart Store Without Spending Money
Driving traffic to your online store doesn’t have to require a large budget. With strategic promotion, you can attract customers without paid advertising. OpenCart provides built-in features that help improve visibility, and by leveraging free marketing tactics, you can generate organic sales.
Step 1: Optimize Your Store for Search Engines (SEO)
Search engine optimization (SEO) increases your store’s visibility in Google and other search engines. OpenCart includes essential SEO tools to help improve rankings.

Enable SEO-Friendly URLs
- Go to System > Settings > Server and enable Use SEO URLs.
- Rename the htaccess.txt file to .htaccess in your server’s root directory.
Optimize Product and Category Pages
- Write unique meta titles and descriptions for each product.
- Use descriptive product names with relevant keywords.
- Fill in the SEO Keyword field under Products > Data to create clean, keyword-rich URLs.
Start a Blog
- Publish helpful content related to your products, such as buying guides and tutorials.
- Share blog posts on social media and encourage customers to comment.
Step 2: Leverage Social Media Marketing
Social media is a free and powerful way to drive traffic to your store.
- Create Business Pages – Set up Facebook, Instagram, and Twitter profiles for your store.
- Post Consistently – Share product updates, customer testimonials, and behind-the-scenes content.
- Use Hashtags – Include trending hashtags to reach a wider audience.
- Join Relevant Groups – Engage in community discussions related to your niche.
Step 3: Encourage Customer Reviews and Referrals
Word-of-mouth marketing can be highly effective in building trust and attracting new customers.
- Enable Product Reviews in System > Settings > Options to allow customer feedback.
- Ask for Reviews – Send follow-up emails requesting customers to leave reviews.
- Start a Referral Program – Offer discounts or free gifts to customers who refer new buyers.
Step 4: List Your Store on Free Marketplaces and Directories
Increasing your store’s online presence helps drive traffic from multiple sources.
- Submit your website to Google My Business for local search visibility.
- List your store on free eCommerce directories like Bing Places and Yellow Pages.
- Join forums and communities where potential customers discuss relevant products.
Step 5: Use Email Marketing to Stay Connected with Customers
Even without a paid email marketing tool, you can build a strong customer base through newsletters.
- Enable Newsletter Subscriptions – Go to System > Settings > Mail and configure email options.
- Send Promotions and Product Updates – Use free email tools like Mailchimp (free plan available) to engage subscribers.
- Offer Exclusive Discounts – Reward loyal customers with special deals via email.
Promoting your OpenCart store for free requires creativity and consistency. By focusing on SEO, social media engagement, customer referrals, and email marketing, you can grow your business without investing in ads. Over time, these organic strategies will build long-term visibility and customer loyalty.
How to Track Sales and Customer Activity in OpenCart
Monitoring sales and customer behavior helps you make informed business decisions. OpenCart provides built-in tools to track orders, identify top-selling products, and analyze customer activity. By using these insights, you can improve marketing strategies and enhance the shopping experience.
Step 1: Viewing Sales Reports
OpenCart includes detailed reports that help you track revenue, orders, and customer activity.
Log in to your OpenCart admin panel.
Navigate to Reports > Sales to access:
- Orders Report – View completed and pending orders.
- Tax Report – Track tax collected from sales.
- Shipping Report – Monitor shipping costs and delivery trends.
- Returns Report – Analyze product returns to identify common issues.
Use the date filter to analyze specific timeframes.
Step 2: Monitoring Customer Activity
Understanding how customers interact with your store helps improve engagement and conversions.
- Go to Customers > Customers to see a list of registered users.
- Click Edit on a customer profile to view past orders and shopping history.
- Navigate to Reports > Customers to access:
- Customer Orders Report – Identify frequent buyers.
- Customer Reward Points – Track loyalty points for returning customers.
- Online Customers – View real-time visitor activity.
Step 3: Tracking Top-Selling Products
Identifying popular products helps with inventory management and marketing strategies.
- Navigate to Reports > Products and select:
- Viewed Products – Discover which products attract the most interest.
- Purchased Products – Identify best-selling items.
- Use this data to adjust pricing, run promotions, or restock high-demand products.
Step 4: Using Google Analytics for Deeper Insights
For more advanced tracking, integrate Google Analytics with OpenCart.
- Go to
System > Settings > Edit Store > Server. - Enable Google Analytics and paste your tracking code.
- Monitor traffic sources, user behavior, and conversion rates in your Google Analytics dashboard.
Tracking sales and customer activity provides valuable insights into your store’s performance. By regularly reviewing reports, monitoring customer behavior, and analyzing product trends, you can refine your business strategy and drive growth.
Keeping Your OpenCart Store Secure Without Spending Money
Securing your online store is essential to protect customer data and prevent unauthorized access. OpenCart provides several built-in security features that you can configure without additional costs. By following best practices, you can minimize risks and keep your store running smoothly.
Step 1: Update OpenCart Regularly
Keeping your OpenCart installation up to date is the first step in preventing security vulnerabilities.
- Check for the latest OpenCart version on the official website.
- If an update is available, back up your store before proceeding.
- Follow the update instructions carefully to ensure a smooth transition.
Regular updates include security patches that fix potential exploits, making it harder for hackers to gain access.
Step 2: Change Default Admin Credentials
Using default login credentials makes your store an easy target for attacks. Updating them enhances security.
- Go to System > Users > Users and select your admin account.
- Change the username to something unique.
- Use a strong password that includes a mix of letters, numbers, and symbols.
Additionally, consider restricting access to the admin panel by using an IP whitelist in System > Settings > Security.
Step 3: Rename the Admin Folder
Hackers often target OpenCart’s default admin login URL. Changing it reduces the risk of unauthorized access.
- Connect to your store via FTP or File Manager.
- Locate the /admin/ folder and rename it (e.g., /storeadmin/).
- Update the new admin path in config.php to reflect the change.
This simple step makes it harder for attackers to locate your admin login page.
Step 4: Enable SSL for Secure Transactions
An SSL certificate encrypts data transferred between your store and customers, preventing unauthorized interception.
- If your hosting provider offers a free SSL certificate (such as Let’s Encrypt), enable it.
- In OpenCart, navigate to System > Settings > Server and set Use SSL to Yes.
- Update the config.php and admin/config.php files to use
https://instead ofhttp://.
SSL improves security and builds customer trust by displaying a padlock icon in the browser.
Step 5: Set File and Folder Permissions
Restricting access to certain files and folders helps prevent unauthorized modifications.
- Set the following permissions for critical files:
- config.php – Read-only (
444or400). - admin/config.php – Read-only (
444or400).
- config.php – Read-only (
- Prevent direct access to system folders by adding the following rule to
.htaccess:
This prevents directory listing, which could expose sensitive files.
Step 6: Enable OpenCart Security Features
OpenCart includes several security settings that can further protect your store.
- Limit Failed Login Attempts – Prevent brute force attacks by setting a limit on failed login attempts in System > Settings > Security.
- Enable Captcha – Go to Extensions > Captcha and enable Google reCAPTCHA to block bots.
- Restrict Admin Access by IP – In System > Users > User Groups, limit admin panel access to specific IP addresses.
Securing your OpenCart store doesn’t require a large budget. By updating your store, using strong credentials, enabling SSL, and adjusting security settings, you can significantly reduce risks. Regular monitoring and preventive measures help keep your store and customer data safe.


Login and write down your comment.
Login my OpenCart Account